Blending paths
Blending takes two paths and creates a series of new paths by interpolating the position and attributes of each path. For example, you could blend a blue triangle and a red star to create a series of objects that have increasingly bumpy edges and that are various shades of purple.

- Select the paths you want to blend.
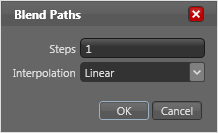
- Click Blend Paths on the Object menu. This opens the Blend Paths dialog box.
- Select the number of new paths you want to create in the Steps field.
- Pick an interpolation method. Linear treats nodes on the source path individually, with no regard for how they relate to adjacent nodes. The Angle and length option takes into account the angle and distance of each node's adjacent nodes when interpolating. The latter method often results in smoother intermediate shapes.
- Click OK.

The resulting paths (called "in-betweens") are grouped together, and the original source paths are not affected in any way by blending.
Note that the direction of each of the two source paths can have a dramatic effect on blending. If you don't like the result of Blend Paths, try undoing it, reversing the path order of one of the two paths, and blend them again.
Blending three or more paths
If you select three or more paths and blend them, Expression Design blends the first two paths, then the second and third paths, and so on. The order of the paths depends entirely on the object stack. The first path is the bottom-most in the stack. The final path is the top-most path. The value you specify in the No. of Steps field determines the number of steps between each source object, and not the total number of paths created.


